Cutting Corners
As promised, I investigated the whole making of “proper napkins” thing this weekend, and then managed to whip off some of them with the left over fabric from the pillow cases I made for Erin last week. Researching wasn’t as easy as I had thought, though. The Martha Stewart website offered a PDF that showed the basic idea, but it didn’t really explain how to make the “hems” in the very first step. So I did a Google search and found a few tutorials on how to sew napkins – but none of them said anything about how to sew the mitred corners together. What to do, what to do?
Well, combine all the directions, of course! So, here for your DIY pleasure is a post on how to make “proper napkins” – with sewn mitred corners – which, as the title suggests, involves a lot of corner cutting. 😉
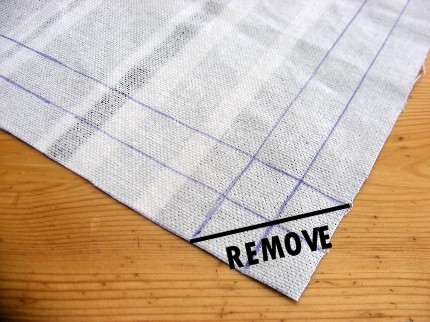
Step 1 – Decide on how large you want your napkins to be. For me this was dictated by how much fabric I had to work with, and I ended up cutting some 16″ squares out of one fabric and some 17″ squares out of another. Napkins generally range from 12″ up to 21″ finished, so decide how big you want them, then add some extra for hems, and cut out your squares. I chose 1/2″ hems and proceeded to draw lines on the “wrong” side of the fabric at 1/2″ from each edge, and then at 1/2″ inch from that line (or 1″ from the edge). Thus, the 16″ squares would become 14″ napkins and the 17″ squares, 15″ napkins, once the folds and hems were accounted for. On each corner, draw a diagonal line as indicated in the photo above, and cut the corners off.
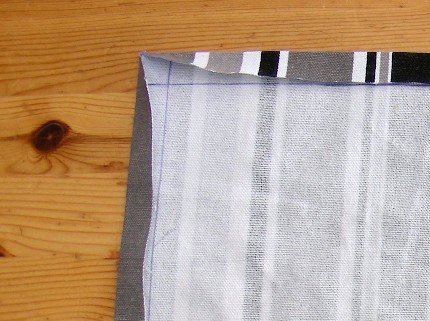
Step 2 – With wrong sides together, fold the outer edges to the inner lines (i.e. make a crease at – but covering – the first set of lines you drew) and iron into place. Notice that the corners you cut off in the previous step now means that there is no overlapped fabric at this point (which would have otherwise bulked everything up).
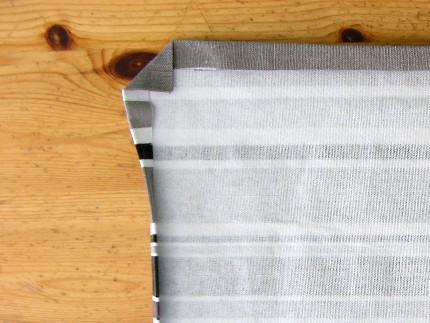
Step 3 – Fold again, at the inner lines this time, and then iron (i.e. there will be three layers of fabric along the edges). Then unfold the new edge creases you just made. At the corners, fold each tip to the inside of the napkin so that you make a right-angled triangle exactly along the point where your inner lines – and those edge creases – intersect (as in the photo above). Iron to crease, then unfold.
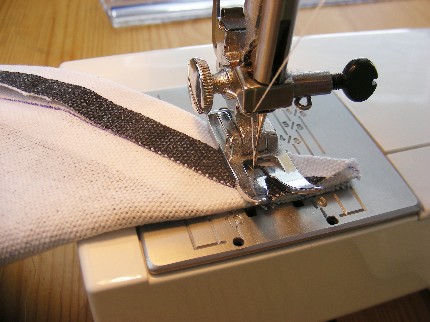
Step 4 – With right sides together, fold your napkin in half diagonally (i.e. make a triangle). At the two folded corners, you are going to sew along the corner creases you just made (i.e. through 4 layers of fabric). The middle of the napkin should be parallel to the front of your machine, and your needle will stitch along that crease at a right angle to the napkin’s middle (i.e. you are making a right-angled triangle at the two corners). When you’ve done these two corners, unfold your napkin and refold in the other direction so you can do this step to the other two corners.
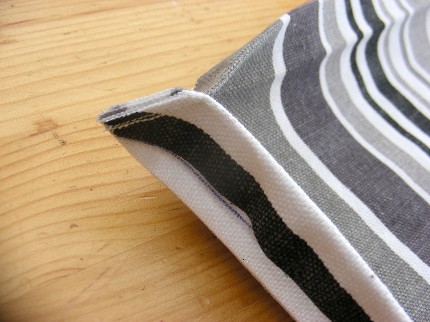
Step 5 – Cut off the little corner triangles you just made, close to the stitching, but not too close. Remember – you are clipping off the excess fabric, NOT the stitching.
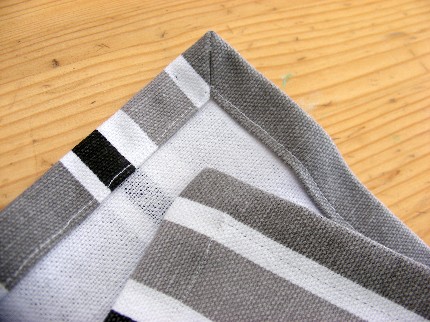
Step 6 – Turn each corner right-side-out so that the stitching on the mitred corners you just made is hidden, and your edge creases (i.e. the second set of folds) sit naturally all the way around. Topstitch along the first set of folds. Voila – “proper napkins”!!!
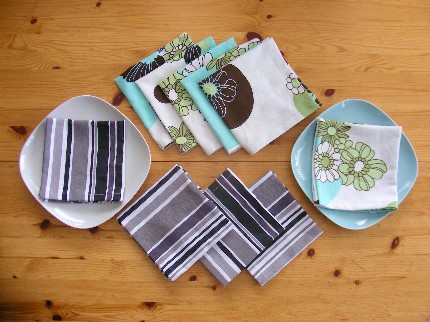
Though it was a bit of work to do, the result was totally worth it – napkins in whatever size and fabric that your little heart desires! While I was sewing, I thought to myself that this would make for some fun “green” crafting too. Say you had a tablecloth with a big stain on it – you could simply cut around the stain and salvage some nice napkins out of the remains. Or if you found/had some great Oxford cotton mens shirts… or a cool sarong that you never wore, but couldn’t bear to part with… Napkins!!!
Anyway. I really hope Erin enjoys them. It’s funny – I can tell that this was an awesome project to share – because now I want to make a bunch of cool napkins for myself! Happy sewing y’all! =)

4 Replies to “Cutting Corners”
Those are so pretty! Great job! Those corners look so professional.
Thanks!
Fantastic work kate, and they are beautiful!!
Thanks, Lisa.